Yeah I Remember! How to use the EEPROM in case of power failure
- Brainy-Bits

- Oct 25, 2020
- 6 min read
Updated: Oct 28, 2020

OVERVIEW

Most projects are built with a simple function in mind, you turn the system on it does something, you turn it off it stops.
When you turn the system back on, it doesn’t remember what was done before and just does the same thing.
But what if you need a project to know what it was doing when the power was cut, so it could continue from that point when the power is restored?
Well you can if you use the built in EEPROM of the Arduino to save some information and make it available later even if the system loses power.
PARTS USED
Arduino NANO
WS2812 LED RING
These are Amazon affiliate links...
They don't cost you anything and it helps me keep the lights on
if you buy something on Amazon. Thank you!
QUICK OVERVIEW
The EEPROM memory on the Arduino is memory that you can save values to and is still available when the system is turned off.
EEPROM stands for : Electrically Erasable Programmable Read Only Memory
Depending on the Arduino your are using you might have more of less EEPROM space available:
ATmega168 (Nano v2.0)- 512 bytes
ATmega328 (UNO, Nano v3.0, Mini) – 1024 bytes
ATmega2560 (Arduino MEGA) – 4096 bytes
For example the UNO can store up to 1024 bytes, a byte can store 8 bits of information.
And 8 bits can store a number from zero to 255.
If we have a look at the main types of used variables with the Arduino:
an INT variable requires two bytes (-32768 to 32767)
a LONG variable requires four bytes (-2147483648 to 2147483647)
So the bigger the number, the more bytes it will require.
We will look at a way to store numbers bigger than 255 in this tutorial.
EEPROM LIFESPAN
EEPROM memory as a maximum of write you can do before it becomes unreliable.
On the Arduino that number is around 100,000 write or erase.
Keep in mind this 100,000 is for each of the byte positions. (The UNO has 1024 byte positions).
Reading the EEPROM does not count towards this number, so you can read as much as you want.
So we want to make sure we don’t write or erase the EEPROM if it’s not needed.
EEPROM COMMANDS
Since a byte can only contain numbers up to 255, how do you store numbers higher than that?
Well if you’re using the Arduino IDE version 1.62 or above it’s easy.
You see before that version, you only had access to .read, .write and .update which only supported reading or writing to only one Byte at a time so you couldn’t store numbers higher than 255 by default, to do so you had to use more code in your sketch if you wanted to store a higher number.
But with version 1.62 and above you now have these commands:
.get (which is similar to .read)
.put (which is similar to .update)
So now you can just do this:
EEPROM.put(0, 1500);
EEPROM.get(0, variable1);
and now you’ve stored or .put the value of 1500 in the EEPROM starting at byte zero, and then got the value starting at byte zero or .get inside variable1 without the need of more coding.
Keep in mind that .read .write and .update commands are still available if you want.
**Note: EEPROM.put is similar to EEPROM.update in that it will only write the data if the values are different… This way minimizing the amount of writes to the EEPROM.
In this tutorial we will be using .write and . read since the numbers we are saving to the eeprom are not bigger than 255 but we will use the .put instead of .write when updating the random number.
CONNECTIONS
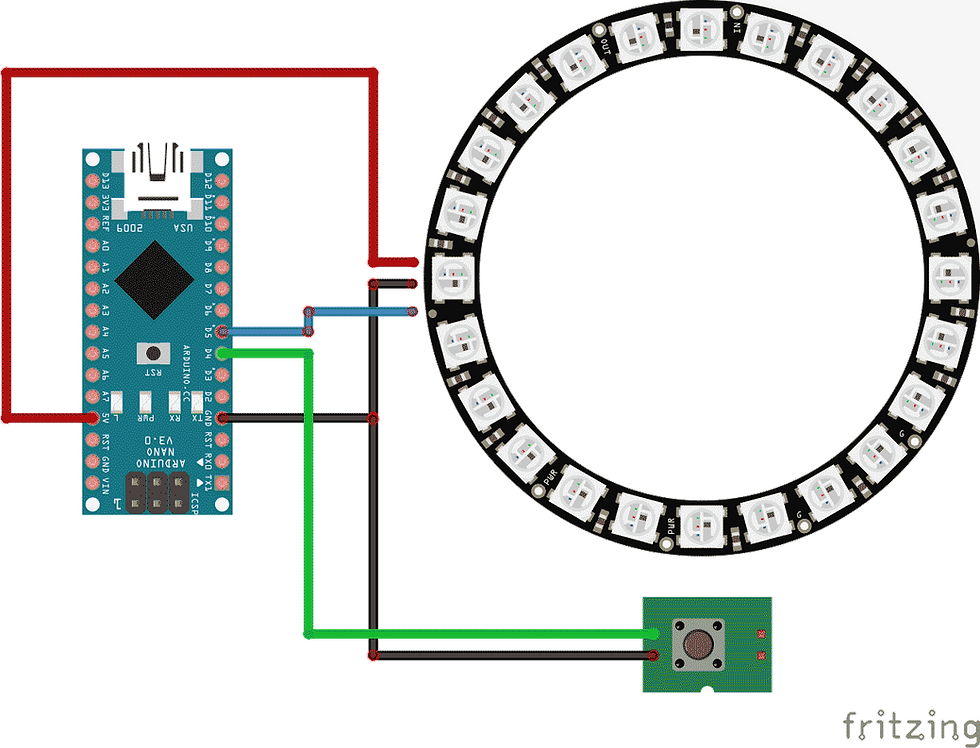
The Connections for this tutorial are:
5V and Ground from the Arduino are connected to the WS2812 LED ring
Pin 5 of the Arduino is connected to the Data pin of the LED ring
Ground for the Arduino is connected to one leg of the Tact switch
Pin 4 of the Arduino is connected to the other leg of the Tact switch
THE CODE
At the start we check the EEPROM byte #256 to see if it contains the value 123, if it doesn’t, that means that this is the first time the sketch as been run on that Arduino.
Then we set byte #256 to 123 for future execution and set byte #0 to zero and the counter variable to a value of zero.
If byte #256 already contains the value 123, then we read byte #0 into the variable counter, since that value should have been updated in the prior running of the sketch.
**Keep in mind that in this code I write to the EEPROM everytime I click the Tact Switch, which is not ideal since that could amount to a lot of writing to the EEPROM. In reality you want to write as little as possible to the EEPROM.
In this code I’m using .write and .read since the number used is not bigger than 255, but I’m also using the .put command which is like using the .update, when saving the random number, which will only write to the EEPROM if the number you are trying to write is different to the one that is already inside the EEPROM byte position.
So the new commands, .put and .get will still work when using smaller numbers if you want. But if your number is bigger than 255 you then need to use .put and .get.
As always please watch the tutorial video for more information.
/* Writing and Reading Arduino EEPROM memory

Created by Yvan / https://Brainy-Bits.com

This code is in the public domain...

You can: copy it, use it, modify it, share it or just plain ignore it!
Thx!
*/


#include "FastLED.h"  // Library to control the WS2812 LED Ring
#include <EEPROM.h>  // Library needed to access EEPROM

// How many leds are connected?
#define NUM_LEDS 24  // Number of leds on the WS2812 Ring

// Define the Pins
#define Tact_Switch 4  // Tact Switch for generating number connected to pin 4 of Nano
#define Ring_Data 5    // Led Ring DATA pin connected to pin 5 of Nano

// Define the array of leds
CRGB Led_Ring[NUM_LEDS];


int SavedNumber;  // Variable to hold the randomly generated number of led to light up


void setup(void) {

  FastLED.addLeds<NEOPIXEL,Ring_Data>(Led_Ring, NUM_LEDS);
  FastLED.clear();  // clear any lit leds on the ring

  pinMode(Tact_Switch, INPUT_PULLUP);  // using Input_Pullup resistor of the Arduino


  // Check if this is first time EEPROM is used
  if (EEPROM.read(256) != 123) {  // not equal to 123
    EEPROM.write(256, 123);  // write value 123 to byte 256
    SavedNumber=0;  // set the number of lit leds to 0

  } else {  // if byte 256 is equal to 123
      EEPROM.get(0, SavedNumber);  // get previous lit leds before power failure
  }
}


void loop() {

  if (SavedNumber != 0) {  // Used prior # of lit LED saved to EEPROM

  }
    // Clear the existing led values
    FastLED.clear();

    // Change led colors
    for(int led = 0; led < SavedNumber; led++) { // uses last saved # of LEDs
    if(led < 9)Led_Ring[led] = CRGB::Red;
    if(led >=9 & led < 17)Led_Ring[led] = CRGB::Green;
    if(led >=16)Led_Ring[led] = CRGB::Blue;
    }

    FastLED.setBrightness(50);
    FastLED.show();


// If tact switch 1 is clicked
  if (digitalRead(Tact_Switch) == LOW) {

    FastLED.clear();

// Cycle led colors before random
    for(int led = 0; led < 25; led++) {
      if(led < 9) {
        Led_Ring[led] = CRGB::Red;
        FastLED.show();
        delay(75);
      }

      if(led >=9 & led < 17) {
        Led_Ring[led] = CRGB::Green;
        FastLED.show();
        delay(50);
      }
      if(led >=17) {
        Led_Ring[led] = CRGB::Blue;
        FastLED.show();
        delay(30);
      }
    }

// Generate a Random number
    SavedNumber=random(1, 24);

// Clear the existing led values
    FastLED.clear();

// Change led colors
    for(int led = 0; led < SavedNumber; led++) {
    if(led < 9) Led_Ring[led] = CRGB::Red;
    if(led >=9 & led < 17) Led_Ring[led] = CRGB::Green;
    if(led >=17) Led_Ring[led] = CRGB::Blue;
    }

    FastLED.setBrightness(50);
    FastLED.show();
    EEPROM.put(0, SavedNumber);  // Put the value of SavedNumber in byte zero of EEPROM
  }
}
CONCLUSION
Depending on the project, having the ability to remember values when the power was cut can be important.
As you saw in this tutorial I used the EEPROM to save the number of LEDs that were lit prior to a power cut, when power was restored it got that number from the EEPROM.
The main commands to communicate with the EEPROM are:
Working with numbers between 0 and 255:
.read
.write
.update
Working with any number values (v1.62+):
.get. (equiv. to .read)
.put (equiv. to .update)
Hope this has helped and thank you for stopping by!
TUTORIAL VIDEO
DOWNLOAD
Copy and Paste the above code/sketch in your Arduino IDE software.
Donwload the FastLed library here:


Excellent technical breakdown of the ultrasonic sensor and Arduino use. I recently came across a similar discussion on a https://cabriostructures.com/ based review blog which also discussed DIY electronics projects.