How to Debounce switches on the Arduino?
- Brainy-Bits

- Oct 24, 2020
- 4 min read
Updated: Oct 28, 2020
OVERVIEW
In the previous tutorial we saw how to connect and use tact switches with an Arduino.

Now we will look at how to make sure that when we press a switch it doesn’t register more than one press.
This is know as “Debouncing”.
PARTS USED
Arduino NANO
Tact Switches
MAX7219 Matrix Module
These are Amazon affiliate links...
They don't cost you anything and it helps me keep the lights on
if you buy something on Amazon. Thank you!
WHAT EXACTLY IS "DEBOUNCING A SWITCH"
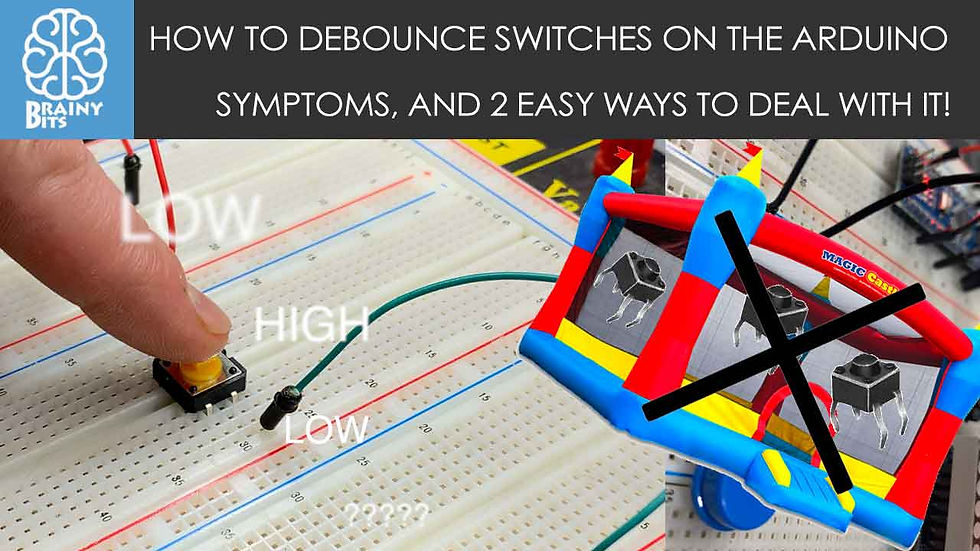
Most switches are simple mechanical devices that make a connection between two contacts.
When you press a switch the contact is made, and like we saw in the previous tutorial the Arduino detects the state (LOW or HIGH), and as long as the switch is pressed the state stays the same.

But not all switches are created equal, and some will fluctuate between both state (this is called “bouncing” from LOW to HIGH) during the pressing of the switch and this can introduce multiple detected presses on the Arduino.
POSSIBLE SOLUTIONS
There are many ways to work around this problem, here are 2 simple ones, with their pros and cons:
Using a simple “delay()” function.
Using the “millis” function.
Using a simple “Delay()” Function
The way this works is when you start pressing the switch the first time the Arduino detects the desired state (LOW in this case) the delay() is started and waits between 50 and 200 milliseconds, this pauses the entire code on the Arduino until the delay is expired.
The reasoning is that the delay will be long enough to not let the Arduino read the bouncing and only register one switch press.
This method works fairly well but there are pros and cons:
Cons:
The delay() function is a ‘blocking’ function, freezing the execution of the Arduino code, so that when the delay is started nothing else can be done, such as reading a sensor or displaying values on an LCD, until the delay is expired.
It can’t be used inside Interrupts.
Pros:
Requires less coding than the millis() function and doesn’t need variables.
Easy to use and adequate for simple projects.
Using the “millis()” Function
The millis() function, when called, returns a time value (in milliseconds) that represent the time passed since the Arduino was powered up.
This timer is started automatically at power up without the need of any coding, so you can just call the function “millis()” to get the current value.
So by using some variables we can know the amount of time passed and use this instead of the delay() function.
The big advantage is that the millis() function is also a “non-blocking function” which means that the Arduino is not paused or frozen, so you can do other things unlike the delay() function which pauses the code completely.
Pros and cons:
Cons:
The millis() function requires a bit more coding since it requires variables compare to know how much time as passed.
The millis() timer will overflow (reset to zero) after approximately 49 days, no really a problem in most cases but something to keep in mind depending on how you use it.
Pros:
Since it doesn’t block or stops the code, you can do other things like check sensors or update display.
Can be used inside interrupts unlike the delay() function.
Useful for accurate timing of actions inside projects.
CONNECTIONS

In this tutorial we will be connecting 4 tact switches.
The black one will demonstrate switch bouncing.
The red and blue will show the delay() and millis() functions.
The yellow one will reset the LED Matrix counter.
THE CODE
All the switches are using the Arduino INPUT_PULLUP resistors to set their un-pressed state to HIGH.
We are also using some button state variables to make sure that when a switch is pressed and held down, the counter does not keep increasing.
Both the delay() and millis() function have a value of 100ms for debounce.
As always please watch the tutorial video for more information.
/* Arduino Switch Debounce Examples

Created by Yvan / https://Brainy-Bits.com

This code is in the public domain...

You can: copy it, use it, modify it, share it or just plain ignore it!
Thx!

*/

// Needed for the LED Matrix
#include <MD_Parola.h>
#include <MD_MAX72xx.h>
#include <SPI.h>

#define HARDWARE_TYPE MD_MAX72XX::ICSTATION_HW
/*  PAROLA_HW,    ///< Use the Parola style hardware modules.
    GENERIC_HW,   ///< Use 'generic' style hardware modules commonly available.
    ICSTATION_HW, ///< Use ICStation style hardware module.
    FC16_HW       ///< Use FC-16 style hardware module.
*/

//Pins from the LED Matrix to the Arduino
#define MAX_DEVICES 1
#define CLK_PIN   13
#define DATA_PIN  11
#define CS_PIN    10

//Switches pins connected to Arduino
#define switchpinBlack 6
#define switchpinRed 5
#define switchpinBlue 4
#define switchpinYellow 3

// Variable used for millis debounce
long TimeOfLastDebounce = 0;  // holds the last time the switch was pressed
long DelayofDebounce = 100;  // amount of time that needs to be experied between presses

// Variable used to save the state of the switches
// Needed so the counter only goes +1 for each keypress

int BlackButtonState = 0;
int RedButtonState = 0;
int BlueButtonState = 0;

// Variable to hold the value of the counter
int displaycounter=0;

// Hardware SPI connection
MD_Parola P = MD_Parola(HARDWARE_TYPE, CS_PIN, MAX_DEVICES);


void setup(void)
{
  P.begin();
  P.setTextAlignment(PA_CENTER);

//All switches use the Arduino input pullup resistors
  pinMode(switchpinBlack, INPUT_PULLUP);
  pinMode(switchpinRed, INPUT_PULLUP);
  pinMode(switchpinYellow, INPUT_PULLUP);
  pinMode(switchpinBlue, INPUT_PULLUP);
}

void loop(void)
{
    // Black Switch - No Debounce
    if (digitalRead(switchpinBlack) == LOW && BlackButtonState == 0) {
      BlackButtonState=1;
      displaycounter++;
      P.print(displaycounter);
    } else {
      if (BlackButtonState == 1 && digitalRead(switchpinBlack) == HIGH) {
        BlackButtonState=0;
      }
    }


    // Red Switch - Debounce using a delay() command
    if (digitalRead(switchpinRed) == LOW && RedButtonState == 0) {
      delay(100);  // The higher the Delay the less chance of bouncing
      RedButtonState=1;
      displaycounter++;
      P.print(displaycounter);
    } else {
      if (RedButtonState == 1 && digitalRead(switchpinRed) == HIGH) {
        RedButtonState=0;
      }
    }


    // Blue Switch - Debounce using a 'millis' timer
    if (digitalRead(switchpinBlue) == LOW && BlueButtonState == 0) {

      // check if enough time has passed to consider it a switch press
      if ((millis() - TimeOfLastDebounce) > DelayofDebounce) {
        BlueButtonState=1;
        displaycounter++;
        TimeOfLastDebounce = millis();
        P.print(displaycounter);
      }
    } else {
      if (BlueButtonState == 1 && digitalRead(switchpinBlue) == HIGH){
        BlueButtonState=0;
      }
    }

    // Yellow Switch - Reset Counter
    if (digitalRead(switchpinYellow) == LOW) {
      displaycounter=0;
    }
  }
TUTORIAL VIDEO
DOWNLOAD
Copy and Paste the above code/sketch in your Arduino IDE software.
Download the Parola library here:


It's always nice to discover content that's written naturally. The article doesn't sound forced, and every paragraph has a purpose. Thank you for sharing something that's genuinely helpful.
82 lottery game
Strong and thoughtful presentation of the topic in this post. I appreciated how naturally the information was delivered without making the content feel too technical or overwhelming. Reading this reminded me of a discussion I had recently seen on https://searenovation.com/ where people were exploring related viewpoints. It is always great to come across articles that manage to educate readers while still maintaining a friendly and engaging tone throughout the entire piece.
Appreciated the detailed review and the way you described the dining experience. It feels honest and informative. I recently came across a similar travel and food perspective on https://www.carsoup.com/ and your article carries that same clarity. It gives readers a good sense of what to expect before visiting.
This was a very clear and well-structured explanation of a topic that can often confuse beginners. The way you simplified the concept of switch debouncing and backed it up with practical examples made it much easier to grasp. In the middle of reading, I was reminded of a similar technical breakdown I saw on https://www.attn2detail.info/, which also emphasized clarity and precision in explaining complex ideas. Your article definitely adds strong value for anyone working with Arduino projects.